Vinyl Lattice Installation
There are several types of vinyl lattice you can use for your projects. With that in mind, there can also be different ways to install the lattice.
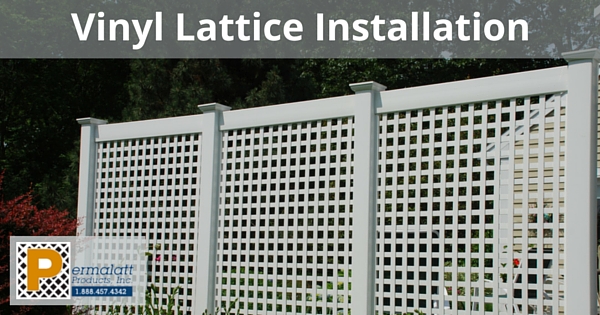
For example, to install lattice as a topper for fencing, you may go about installing it differently than you would if you were enclosing an area beneath your deck.
Before we begin, Permalatt Products, Inc. has a couple of tips that will help you during and after your lattice installation:
- The easiest way to cut a vinyl lattice is with a circular saw. If you reverse the blade you will find that the reversed blade will prevent the saw teeth from chopping through the vinyl lattice. The result is a smoother, cleaner cut sheet of lattice.

- A lattice sheet should be supported a maximum distance of every 4 feet. However keep in mind that most projects require a much shorter distance than the 4’ point for support. The lack of needed support for the lattice sheet can cause the sheet to slip or become vulnerable to strong weather conditions.
- It is easier to install the channel on the lattice and then place the lattice sheet in the desired area than it is to mount the channel and try to fit the lattice in.
You can screw through the channel to the support or you can screw through the channel and lattice sheet to secure it to the support structure.


We want to mention one more thing: Depending on the type of “vinyl” lattice you use in your project, you may need to predrill oversized holes throughout the lattice sheet before installation.
You may also be instructed to make sure you do not over-tighten the screws. What is the reason for this? Actually, it is the plastic or HDPE type lattice that mentions the need for oversized holes.
The plastic or HDPE lattices will expand in warm weather and retract in cold weather. The expected expansion or retraction rate is 1/16” per foot.
If the lattice sheet is over-tightened to the support structure, it will either warp the sheet or crack the lattice at the fastener, depending on the temperature.
Please note: with the DuraShell® and Decorative 3D lattice the expansion and retraction is not an issue.
Keeping the tips we mentioned in mind, you have a couple of options as to how you mount the lattice sheet for your project.
Lattice attached to the front side of the structure.
You can mount the lattice sheet directly to the self-supporting frame or structure. This type of installation is most commonly used when installing lattice under a deck.
You can use staples, stainless steel screws or even nails to fasten the lattice sheet to the frame or structure. You can attach the lattice on the back side of the structure so the edges are hidden or you can attach the lattice on the front side of the structure revealing the edges.
The achieved look is totally up to you. Check out these ideas from Houzz.com for some creative inspiration.
Lattice is placed within a slotted rail and post creating a lattice fence.
If installing lattice with in a railing, you can chose a slotted rail which will allow the lattice sheet to sit within the rail giving the lattice sheet a framed look. In the photo above, the lattice is within the railing and post.
Remember when you cut your lattice sheet the “reveal” of the lattice sheet is less than the actual sheet size. In other words, don’t forget to add the depth of the slot to the sheet size when cutting.
In this photo the lattice is free floating in the u-channel.
You can choose to use a u-channel with your lattice installation. This means you “frame” the lattice sheet in a u-channel before installing.
Another accessory to work with while using the u-channel is an h-channel. The h-channel will connect two sheets of lattice.
Ok, so how do you install the lattice with the channels? As we mentioned earlier, it is much easier to add the channel to the lattice prior to installation. It’s the best installation method for putting the lattice sheet within a confined area.
It can be extremely hard to twist and bow the sheet to fit in the channel that is already attached to the support structure. To prevent this aggravation, place the channel around the lattice first.
Then put the lattice in the desired location. Now, you can either screw through the bottom of the U on the channel directly to the post or rail, or you can screw through the channel and lattice to the post or rail.
I’m sure you may find other options for the installation of lattice in your project. Today we have offered you the most common ones.
As with any project, the materials you use and the installation is completely up to you. It’s important to consider what manufacturer’s suggested instructions are regarding their products and installation as well.
Permalatt Products, Inc.’s lattice is offered in many openings sizes. This will allow you to capture any desired look for your project. We offer standard and custom sheet sizes, so check out our product page for more information.
We also have the u-channel and h-channel available. Our product carries a lifetime warranty, and works great in any project! Contact us today with any questions you may have and we’ll be happy to help.